Test Executions
To start the Test Execution, click on the "START EXECUTION" button. The Test Execution view opens.

Test Execution view for a Structured Test Case

Test Execution view with test status.
In the Test Execution view, you can add responsible users with the role "Tester".
The "Test execution" view separates test status and test result.
The test status represents the progress of the Test Execution. The following status is defined:
- New
- In Progress
- Paused
- Blocked
- Finished
- Closed

Test Execution view with the test result.
The test result reflects the final state of the Test Execution. The following results are possible:
- Automatic: Pending
- Automatic: Passed
- Automatic: Failed
- Manual: Passed
- Manual: Failed
- Manual: To Check
- Manual: Aborted
Usually, the test result is determined automatically from the test results of the individual test steps in the Test Sequence. However, you can also set the test result manually. If no test steps are available, this is the only option. In this case, an icon with a wrench appears next to the result, indicating that the result was entered manually.
To mark a test step as "Passed", click on the icon with the hook. The icon will turn green. To mark a test step as "Failed", click on the icon with the bug. The icon will turn red. You can also change the status of a test step again by clicking on the corresponding icon again.
 |
For the Preconditions, their fulfillment status is displayed. Note that you cannot change this status in the Test Execution view. |
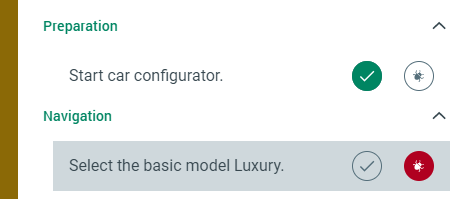
Test steps marked as passed or failed.
When you mark a test step as "Failed" by clicking on the icon with the bug, a form for creating a Defect opens on the right. Enter the Defect name and click the ADD button to open the Defect detailed view. For more information, see chapter Defects.
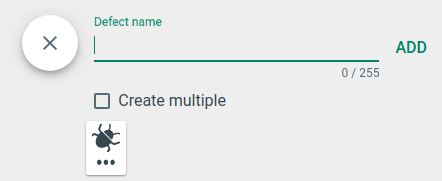
Adding a Defect.
Another way to add a Defect is to click the "Plus" button to the Test Case's right (see figure below), e.g., if you have set the test result manually and/or do not want to link the Defect to a specific test step. Clicking the bug icon in the "Global Defect(s)" section (see figure below) has the same effect.

Test Execution view for a Checklist Test Case

Checklist steps marked as passed failed, or not applicable.
In a Checklist Test Case, you can mark each test step as passed, failed, or not applicable. As soon as a test step fails, the Test Case result is set to "Failed".
Adding Defects works in the same way as for Structured Test Cases. You can also add comments to individual checklist steps.
To stop the Test Execution, click on the button "STOP" or "PAUSE". Note that the execution is stopped but not aborted.
You can continue the execution with the help of the Test Execution History.